BulletProof FTP Client fully supports network environments where the computer running the software is behind a network Firewall/NAT.
The file-transfer provided by FTP copies a complete file from one system to another (SERVER to CLIENT, CLIENT to SERVER). In this transfer a computer running BulletProof FTP Client (http://www.bpftp.com) is called the CLIENT and a person running a FTP Server is called a SERVER. A SERVER is a piece of software which adheres to the Internet FTP standard (RFC-959), such as our specially designed BulletProof FTP Server (http://www.bpftpserver.com), but often times the type of server is hidden or not published.
To configure BulletProof FTP Client correctly you must have the following information and access:
The File-Transfer-Protocol (FTP) was designed way back in 1985 to facilitate early file transfers on the Internet. This robust and elegant protocol allows for the transferring of files from server-to-client and client-to-server. However, being over 20 years old, this protocol isn't without it's downside; it's firewall/nat traversal is highly confusing and can be pretty technical. Not to fear! With a bit of terminology and some guidance, this "HOW-TO" can help you setup BulletProof FTP Server in no time!
When using a CLIENT, it is sometimes important to understand that there are two types of connections made, control-connections and data-connections.
The control-connection is established in the typical client-server fashion, the SERVER creates a listening socket on the well-known port for FTP (TCP/21) and waits for the CLIENT to make a connection. This default TCP/IP connection on port 21 (shorthand TCP/21), but the SERVER administrator can change this value to anything they wish; as often times, chaing this port can help "hide" the FTP service from would-be hackers or malicious software (virus, worms, etc). This control-connection remains open during the entire time that the CLIENT communicates with the SERVER. This connection is used for commands from the CLIENT to the SERVER and for the SERVER's replies.
The data-connection is created each time a file or data is transferred between the CLIENT and SERVER. FTP uses this data-connection is used in three different ways:
When a CLIENT (BulletProof FTP Client) requests a directory-listing from the SERVER (such as BulletProof FTP Server), the command (LIST) is sent across the control-connection and a data-connection is made to transfer the directory-listing. This avoids any potential limitations that might restrict the size of a directory-listing and makes it easier for the client to save the output and display it in an easy to use point-click interface. During this transfer, the control-connection remains idle while the data-connection is in use.
The creation of the data-connection is dictated by the CLIENT upon issuing of an FTP command (get a file, put a file or obtain a directory-listing). Unfortunately, this is when FTP becomes difficult for most people:
Configuring BulletProof FTP Client to operate in Passive-Mode (PASV-mode) is very easy, however you will need to break out the manual for your Firewall/NAT (Linksys, Netgear, Cisco, etc) appliance in order to allow the specified incoming TCP/IP connections.
Operating in PASV-mode is by far the best scenario, as there is no firewall configuration or understanding needed. Smart FTP Administrators will always setup their FTP Servers to operating in PASV-mode as they are usually the ones with a constant connection to the internet, a static-IP address and knowledge of firewall rules and TCP/IP routing.
If you can't get into the FTP Server using PASV-mode, get in contact with the Administrator and ask them to enable it. Chances are it was just an oversight and they'll happily enable the feature. If they prove unresponsive; No Problem! You're a smart and savvy internet user, just proceed to the next step and configure your NAT/firewall.
 |
Step 1 Start BulletProof FTP Client from the Windows Start-Menu and make sure you can clearly see it's main user-interface. If you do not have BulletProof FTP Client installed on your computer, you can download a fully functional trial version from our website (http://www.bpftp.com). |
 |
Step 2 From BulletProof FTP Client's main user-interface, pull-down and select Options -> General Options.... |
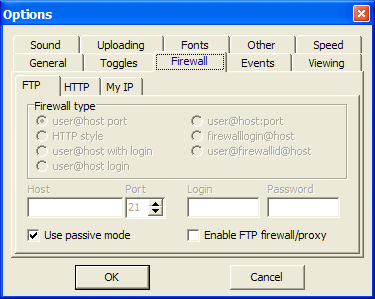 |
Step 3 Check Use passive mode and click OK to save your changes. |
 |
Step 1 Start BulletProof FTP Client from the Windows Start-Menu and make sure you can clearly see it's main user-interface. If you do not have BulletProof FTP Client installed on your computer, you can download a fully functional trial version from our website (http://www.bpftp.com). |
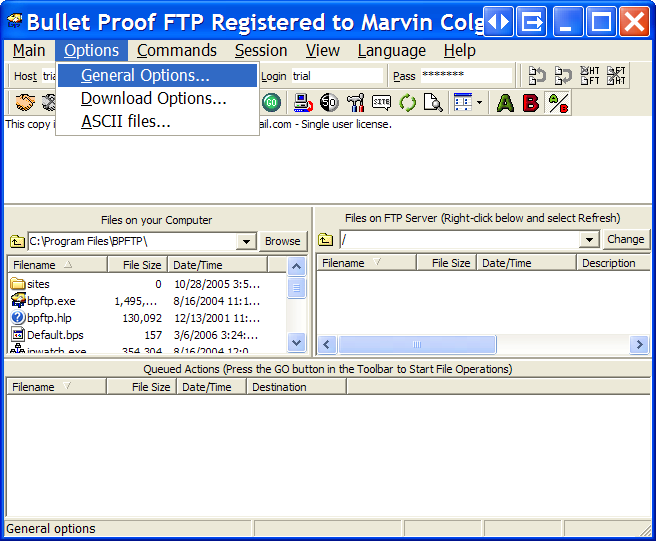 |
Step 2 From BulletProof FTP Client's main user-interface, pull-down and select Options -> General Options.... |
 |
Step 3 Make sure Use passive mode is not checked. Don't click OK just yet... |
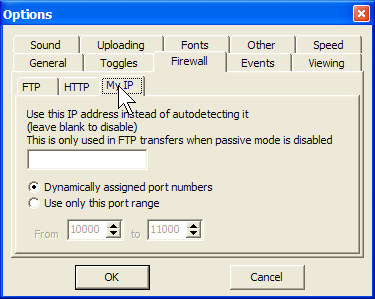 |
Step 4 Click on the tab labeled My IP.
|
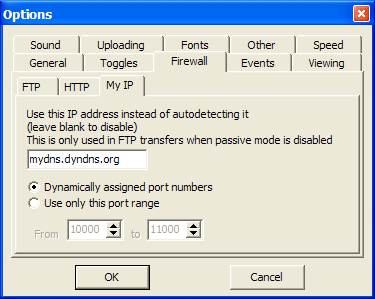 |
Step 5 (Optional) Optionally, if you have a static IP address or use a DDNS (Dynamic DNS) service (such as the one offered by http://www.dyndns.org) input the value here. I highly recommend that you look into this type of service as most NAT/Firewall support this inside the firmware and the IP address connected to the DNS entry on the fly! |
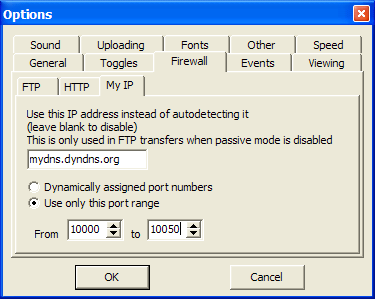 |
Step 6 Click on the radio-button labeled Use only this port range and enter a range of TCP/IP ports. I recommend using 59,100 through 59,199, but your really only need 1 port per data-connection. A range of 99 would allow you to run up to 99 FTP transfers at any given time. Click OK to save your changes.
|
| Step 7 Now you must login to your NAT/Firewall and setup Port Forwarding of the data-connection ports you defined in Step 6 to be forwarded to the internal ip-address the computer running BulletProof FTP Client. Due the vast number of NAT/Firewall devices on the market, you're going to need to break-open the manual for your NAT/Firewall. For your convenience, the following URL will direct you to a website (Not Affiliated with BulletProof Software) that might help: |
Software | Members | Support | Blog | Contact Us
Copyright © 1997-2026 BulletProof Software. All rights reserved. Privacy Policy.
Your IP has been logged as: 216.73.216.40